September Fly of the Month
2 Hot Pink and Purple Series
Dean Wellman, BRSC Financial Secretary – Brule, WI
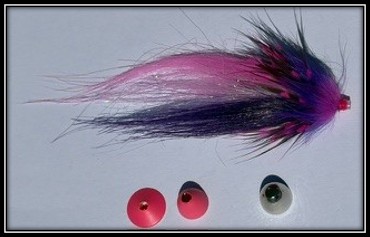
Last fall, I modified the Pink and Purple Dolly Lama that we featured as the October 2022 Fly of the Month. I wanted a fly that held less water when cast than the Dolly Llama, so I used the approach we introduced with Dave Pinzckowski’s Hair Series of tube flies in October 2025. I also wanted a fly that would push water with a larger head profile. By combining lead wire with accessories, such as Dodger Disks or Alaska Brass Cones, you can make a fly that sinks as quickly as you like. The disks don’t add much weight, but they do push water that makes the fly move in the currents. They come in different colors, but I’ve been using “neon pop” hot pink fingernail polish to color them. I usually have my wife Pauline pick out what I want, so I don’t have to go through the checkout!
If you’re new to tube flies, here’s a great tutorial that will help with this fly (Tube flies(opens in new tab)).
Recipe
- Thread: White Semperfli Nano Silk 100D 6/0.
- Tube: 2mm Pro Sportfisher Pro Classic Tube. Place a 1¼-inch long piece on a tube fly needle in the vise. Attach the thread about 5/8 inch from the rear of the tube and overwrap about ¼ inch of the tube to make a thread base. Let the thread hang about 1/16 inch from the rear end of your base wrap.
- Flash: UV Pearl or Pearl Hareline Shimmer Fringe, Hareline Ripple Ice Hair 4 Inch, or Hareline Ice Dub. Tie in the flash to either the top or bottom of the tube (or both). Bottom-side flash should be 2 – 2½ inches long. On the top side, it should be 2½ – 3 inches long. You can use different amounts of flash and different colors to create unlimited variations. Shimmer Fringe is easy to apply as it comes pressed on a 3/8-inch band and you simply cut the amount you want to use. The maximum length is ~3 inches, which is perfect for this fly. Ripple Ice Hair 4 Inch and the Ice Dub are packaged as loose fibers. They create a crinkled, fluffy wing (which I like), but they are a bit messy and trickier to apply. If you use either of these, pull out a bunch of fibers and make a fiber noodle about ½ inch wide and 2 inches long. Roll one end into a tight bunch and place it on top of the thread base. Make a loose wrap and then one very strong pinch wrap. Gently pull out all the loose fibers and place these on top of the bunch. Tie them in with the same loose wrap and pinch wrap. Repeat the process until you have the desired amount of flash. Then, brush out the flash and trim off any excess. I can get a 3-inch-long flash using the Ripple Ice Hair and one that is 2 – 2½ inches long using the Ice Dub.
- Top Wing: Hot Pink Craft Fur. Cut a good-sized clump to create a wing about 3 – 3½ inches long. Tie the fur in on the top side of the tube where the flash is longest. Pinch the fur tightly about ¾ inch from the cut end (the bundle should be about 1/8 inch in diameter) and strip out any shorter fibers that pull out easily before tying it in as firmly as possible. Trim off any standing fibers and wrap your thread through them.
- Under Wing: Purple Craft Fur. Tie in a 2½- to 3-inch-long wing on the bottom side of the tube using the same method as in step 4.
- First Collar: One or two hot pink guinea hen feathers. Select feathers that are long enough to make 2 or 3 wraps. Strip the fuzzy fibers off the stem for the tie-in. Now, pull the tip of the feather backwards and cut off the very end fibers. This will create a triangular “anchor” point to tie the feather in. Make sure the curved side of the feather faces down. After tying it in, grab the feather by the stem, and make 2 or 3 wraps, stroking fibers rearward to form a neat collar. Tie off.
- Second Collar: Pink and purple Hareline two-toned crosscut rabbit strip. Fur from the strip is used as dubbing, which can be tricky. I use two 2-inch-wide clear plastic clips to hold and prep the fur. Cut a 1½ inch long piece out of the strip that has the longest hair with nicely died purple ends. Cut it from under the hide with a razor blade, trying not to cut any hair. Now, gently pull the hair away from the hide so it stands away from the hide. Clamp the fur strip lengthwise from the hide side close to the hide using one of the clips. Pull the hair away from the clip so that the hide butts firmly up to the inside of the clip jaws. Gently pull the hair so that it is sticking out perpendicularly to the clip. Now, clamp the fur ends using the second clip. The 2 clips will be facing each other at this point. Slowly pull the second clip away from the first one until you see about 3/8 inch of hair. Next, cut off the hair as close as possible to the clip holding the hide. If you did this correctly, only the hide will remain in the first clip and the hair will be in the second clip. The butt ends of the hairs will be sticking out so they can be placed in a dubbing loop (Dubbing clips(opens in new tab)). Create a dubbing loop (Dubbing loop(opens in new tab)) and capture the fur in the second clip. Once the fur is securely held in the loop, release the clip holding the fur and spin the loop a few times. Cover the head area of the fly with the spun rabbit hair. This usually takes about 3 or 4 wraps. You can moisten your fingers here and pull the rabbit hair rearward so as not to trap any fibers. Tie off the dubbing loop with a 3- or 4-turn whip finish.
- Optional Head: Silver Alaska Brass Cone or Dodger Disk painted with neon pop hot pink fingernail polish. If you add either of these, place a small drop of superglue on your whip finish. Push the cone or disc onto the tube and tightly against the spun hair. Cut the excess tubing off, leaving about 3/32 inch. Lastly, carefully melt the end of the tube to form a flared end so that the cone or disk does not come off. Be very careful not to melt the tube so much that your line will not go through it to rig the hook!
- Rigging the fly: Slip a piece of clear 3.2mm Pro Sportfisher Pro Classic Tube over the end of the tubing the fly is tied on as the junction tubing. Thread the leader through both pieces of tubing. Snell the hook to the leader (Snelling(opens in new tab)). Snug the leader and hook up until the hook eye seats in the end of the junction tubing. You can also use a double surgeon’s loop knot (Surgeon’s loop(opens in new tab)). Adjust the distance you want the hook back in the wing by snugging the surgeon’s knot forming the loop into the junction tubing. Generally, the hook is set almost back to the end of the wing, but that’s up to you. Size 2 – 6 Gamakatsu octopus hooks are a good choice, depending on the size of your fly.
This fly, tied without weight, fished beautifully on my Trout Spey with an OPST 7.5-foot 60 grain micro sink tip. On the first cast, a 3-pound chrome steelhead torpedoed the revamped Dolly Llama and thoroughly made my day with its acrobatics. In the next run, a 3-pound brown ate it on the first cast immediately after the fly hit the water. I think it works!
We always enjoy feedback on our Fly of the Month postings. Click here Feedback(opens in new tab) to let us know how we’re doing or if you have any questions!