August Fly of the Month
EZ Mouse
Dean Wellman, BRSC Financial Secretary – Brule, WI
John and Sarah Rodgers ran the first fly shop in Brule out of their old farm house near the Brule River Classic cabins on Hwy 27. John told me about mouse fishing sometime after my Dad bought me my first Fenwick fly rod for my birthday. I remember John saying I should use a deer hair mouse in the late evenings and after dark in the water at the cabin. He said he caught his biggest browns that way. After that, my brother and I could be found casting a deer hair mouse from our canoe in the almost pitch black of night in late July and August. I have many fond memories of those days, including our change to fishing a scum frog using a bass rod. Once, my son Erik was in the front of the canoe. His cast into the darkness produced the familiar “splat” of the scum frog hitting the water. While slowly retrieving to imitate a swimming mouse, it sounded like a bowling ball falling from the sky in the blackness of night. Erik counted to 3 before setting the hook as hard as he could. After the initial madness and thinking he had hooked the largest brown ever, our flashlight revealed the beady eyes of a very large beaver with the scum frog stuck in his butt. A quick pull and the barbless hook pulled right out, a story that will be told forever in our family!
I never really liked making a mouse by spinning deer hair and using a piece of old leather glove for a tail. I “googled” EZ mouse fly patterns in June and the Morrish Mouse filled the screen. The Morrish mouse was created by Ken Morrish of Oregon in 2002 to use on the rivers of the Kamchatka Peninsula in Russia for large rainbows. Ken suggests that after you plop the fly next to the bank and start to skitter it across and down the river that you add verbal sound effects like, “I’m scared, please don’t eat me!” The EZ mouse is easier to tie than either the spun deer hair mouse or the Morrish Mouse using spun deer hair.
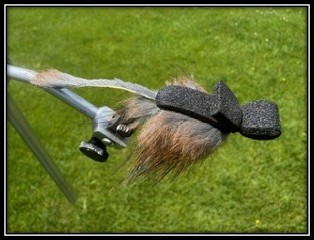
Recipe
- Hook: Size 2/0 Owner 5100 worm hook with the 2 worm holding barbs next to the eye pinched down. I think this is the best hook for this fly. A 1/0 works for a smaller version.
- Thread: Black UTC 140 denier (great for foam). Attach the thread behind the hook eye and overwrap the hook slightly into the bend.
- Tail: Muskrat hide: Tie in a 2½-inch piece of 1/8- inch wide muskrat hide with all the hair trimmed off except a ¼-inch tuft at the end. This will add movement in the tail. Attach this on top of the hook shank using about 1/4 inch of the hide. Wrap the thread forward stopping about 2 eye widths behind the hook eye.
- Body (first part): Black open cell 3mm thick foam. Cut a 4-inch strip that is 1/2 inch wide at one end and 5/16 inch wide at the other end. A metal ruler and utility blade work well for the cut. Place the small end of the foam on top of the hook with the foam extending rearward. Catch 1/16-inch of the foam with 3 or 4 slightly firm wraps and then 6 successive equally spaced spiral wraps towards the rear of the hook. Start with slight pressure increasing to a very firm wrap for the last one. This makes a nice segmented body covering up the hook shank to the attached area of the tail. Note that the remaining foam will be pointing rearward and used in step 6.
- Body (second part): Zonked strip of muskrat hide about 5/32 inch wide. Use a strip that is about 5 inches long. Add a small drop of superglue to the top of the foam where the thread is hanging. Attach the muskrat strip with a few firm wraps, and then spiral the thread forward, catching the top of each foam segment to the hook eye ad leaving the 2-hook eye space to the eye. Now, firmly palmer the muskrat strip to the hook eye using touching wraps while not catching any hair from the previous wrap. Tie off and trim the excess hide.
- Body (first part): Spread the muskrat fur on top of the hook equally to each side of the hook shank. Then, pull the foam strip firmly over the top. With 3 or 4 firm wraps, secure the foam to the top of the hook shank. Next, push down the foam at the front end and bend it backwards over the top of the foam, creating about a ½-inch doubled-over head. Secure with the 3 or 4 firm wraps in the same spot as previous wrap. Whip finish a couple times using 4 or 5 wraps. Trim off the remaining foam so it’s about ½ inch long. This adds floatation and also creates “ears.” I then use UV craft resin covering the threads on the underside of the hook and hit it with UV light.
This fly takes no more than 5 minutes after you get the hang of it. You can spray the body with Rain-X if you wish, which helps repel water.